1. Open the email or log in
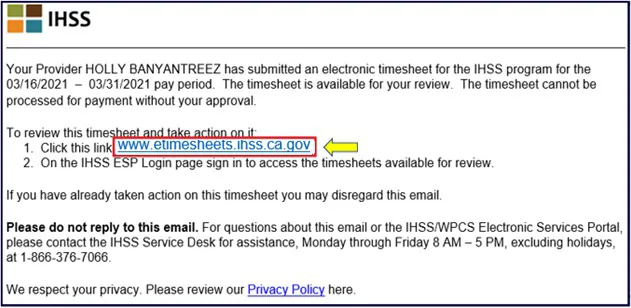
When your provider submits a timesheet, you get an email with a link to review it. Click the link to go to the ESP. You can also log in any time at www.etimesheets.ihss.ca.gov.
Source: CDSS ESP Approving or Rejecting Timesheets, 10/2026, page 2
2. Log in
Enter your username and click Continue. Choose how to get your 6-digit one-time passcode, then enter it.
The passcode expires after 10 minutes. If it did not arrive or it expired, click Resend Passcode.
Source: CDSS ESP Approving or Rejecting Timesheets, 10/2026, page 3
3. Open the timesheets to review
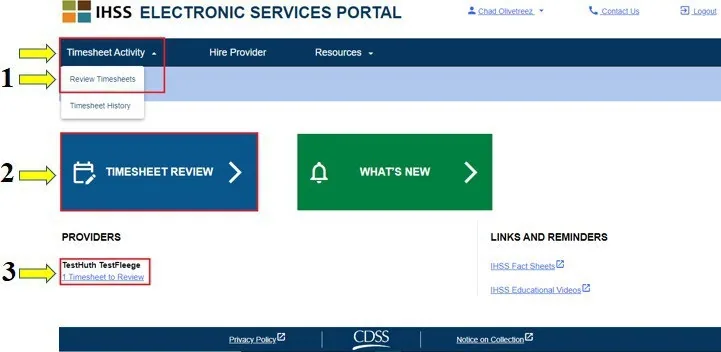
On the main page there are three ways: click Timesheet Activity and then Review Timesheets; or click Timesheet Review; or click Timesheet to Review under your provider’s name.
The Timesheet to Review link only appears when there is a timesheet to review.
Source: CDSS ESP Approving or Rejecting Timesheets, 10/2026, page 3
4. Choose your provider
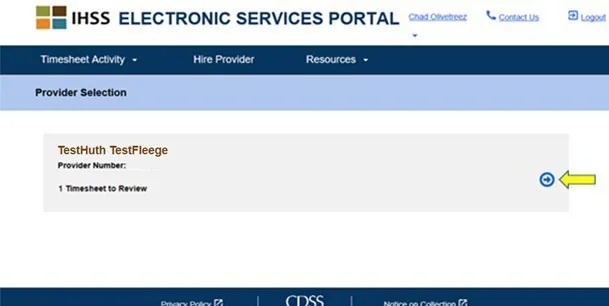
The Provider Selection screen lists the providers who work for you. Click the blue arrow on the right next to the provider whose timesheet you want to review.
If you clicked Timesheet to Review under your provider’s name, you skip this step and go straight to the Timesheet Review screen.
Source: CDSS ESP Approving or Rejecting Timesheets, 10/2026, page 5
5. Choose the pay period
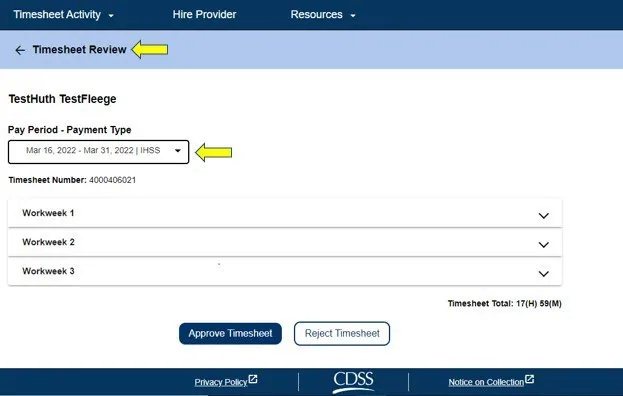
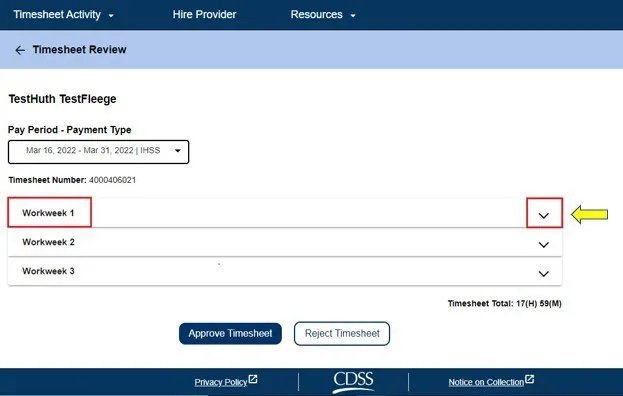
On the Timesheet Review screen, choose the pay period and the timesheet type (IHSS or WPCS) from the drop-down lists.
For most recipients the timesheet type is IHSS.
Source: CDSS ESP Approving or Rejecting Timesheets, 10/2026, page 6
6. Open a workweek
You can review the Timesheet Total, or open each workweek to see the hours for each day. To open a workweek, click the arrow next to it.
Source: CDSS ESP Approving or Rejecting Timesheets, 10/2026, page 7
7. Check each day (provider who does not live with you)
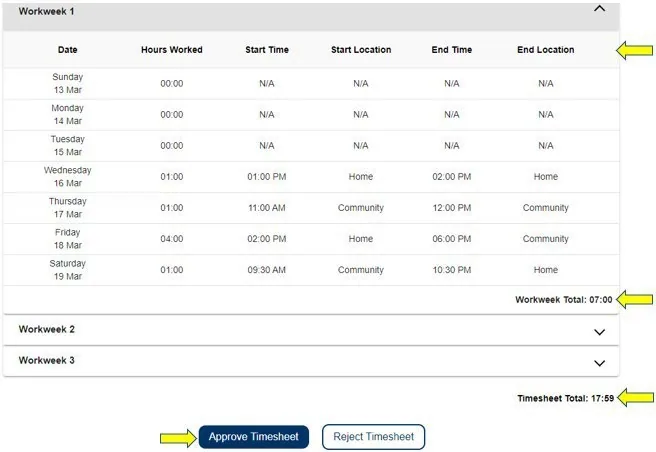
A provider who does not live with you enters Hours Worked, Start Time, Start Location, End Time and End Location for each day. Check them. You also see the Workweek Total and the Timesheet Total. Open the other workweeks the same way.
Source: CDSS ESP Approving or Rejecting Timesheets, 10/2026, page 8
8. Check each day (provider who lives with you)
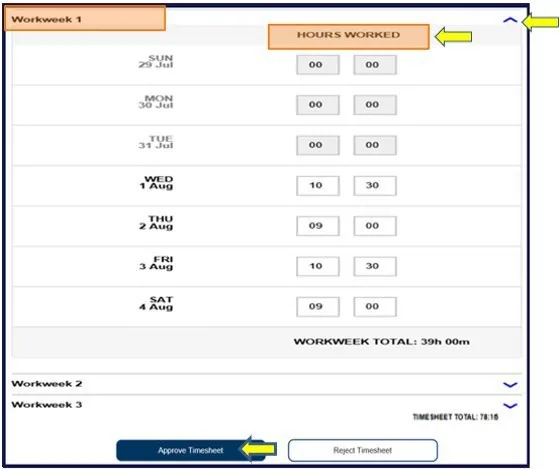
A provider who lives with you enters only Hours Worked. Check the hours for each workweek and each day.
A provider can self-certify as a live-in provider in the ESP, or with form SOC 2298. After that, the start time, end time and location fields no longer appear for the recipients they live with.
Source: CDSS ESP Approving or Rejecting Timesheets, 10/2026, page 10
9. Approve and sign
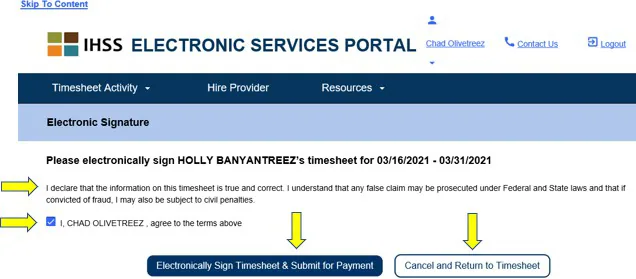
If the hours are correct, click Approve Timesheet. On the Electronic Signature screen: read the Declaration, check the box to agree, then click Electronically Sign the Timesheet & Submit for Payment. Not sure the hours are right? Click Cancel and Return to Timesheet.
Source: CDSS ESP Approving or Rejecting Timesheets, 10/2026, page 11
10. Confirm
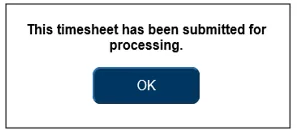
A pop-up says This timesheet has been submitted for processing. Click OK. Your provider gets an email that the timesheet was approved. You go back to the main page, where you can review more timesheets or log off.
Source: CDSS ESP Approving or Rejecting Timesheets, 10/2026, page 12
11. Reject a timesheet with wrong hours
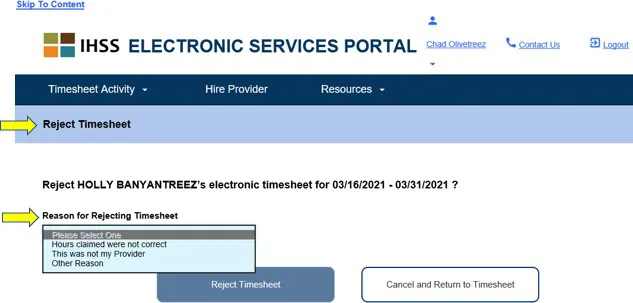
If the hours are not correct, click Reject Timesheet on the Timesheet Review screen. Choose the reason from the drop-down list, then click Reject Timesheet. To keep the timesheet instead, click Cancel and Return to Timesheet.
Rejecting a timesheet lets your provider review it and make corrections.
Source: CDSS ESP Approving or Rejecting Timesheets, 10/2026, page 14
12. Confirm the rejection
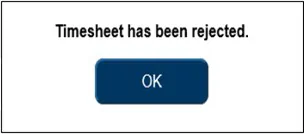
Your provider gets an email that the timesheet was rejected. A pop-up says Timesheet has been rejected. Click OK. You go back to the Timesheet Review screen if you have more timesheets for the same provider, or to the main page.
Source: CDSS ESP Approving or Rejecting Timesheets, 10/2026, page 16