
IHSS Provider

How to request paid sick leave in ESP

8 stepsCDSS 10/2026

Independent guide based on official CDSS documents. Not affiliated with CDSS, the State of California or any county.

This guide shows how to see your sick leave hours and send a paid sick leave claim in the ESP. You can only request paid sick leave that you have earned.

Screens may look slightly different today.

  • Log in

    Enter your username and click Continue. Choose how to get your 6-digit one-time passcode, then enter it.

    Button to click on the screen:Continue

    The passcode expires after 10 minutes. If it did not arrive or it expired, click Resend Passcode.

  • Open Sick Leave Claim

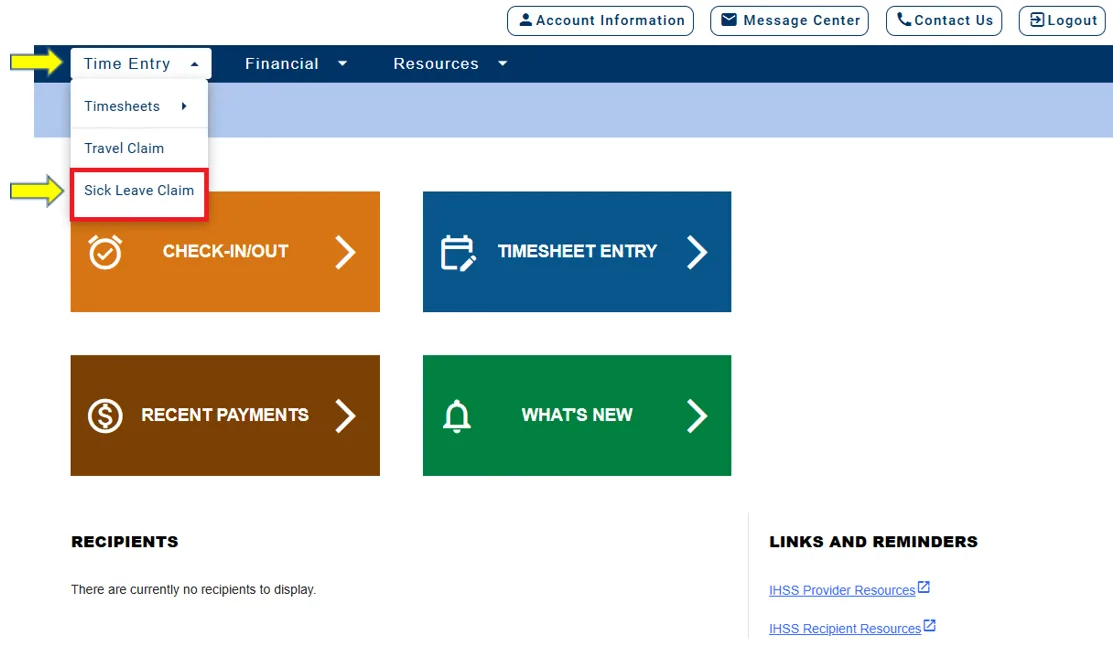
    Step 2: The ESP Time Entry menu open, with the Sick Leave Claim option highlighted.
    CDSS screen, ESP Website Sick Leave Claim, 10/2026

    On the Provider Home screen, click the Time Entry menu, then click Sick Leave Claim.

    Button to click on the screen:Sick Leave Claim

  • Check your hours

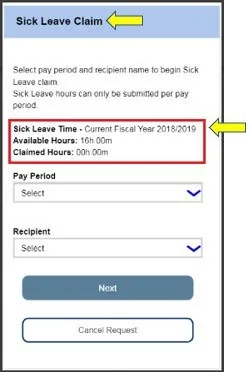
    Step 3: The Sick Leave Claim screen with the Sick Leave Time, Available Hours and Claimed Hours highlighted.
    CDSS screen, ESP Website Sick Leave Claim, 10/2026

    The Sick Leave Claim screen shows your Sick Leave Time, Available Hours and Claimed Hours for the current fiscal year.

    In July, if you still have available hours from the prior fiscal year, that year is shown too. You can still claim sick leave for a date in the prior fiscal year.

  • Choose the pay period and the recipient

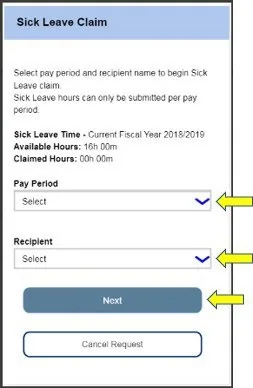
    Step 4: The Sick Leave Claim screen with the Pay Period and Recipient lists and the Next button.
    CDSS screen, ESP Website Sick Leave Claim, 10/2026

    Select the pay period and the recipient you worked for in that pay period, then click Next.

    Button to click on the screen:Next

  • Enter your sick time

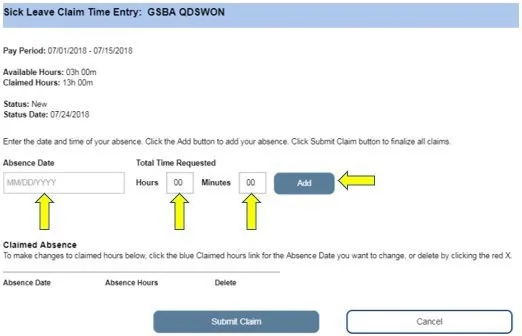
    Step 5: The Sick Leave Claim Time Entry screen with the Absence Date box, the hours and minutes boxes and the Add button.
    CDSS screen, ESP Website Sick Leave Claim, 10/2026

    Type each sick date in the Absence Date box. Enter the hours and minutes you were absent but eligible to work. Click Add.

    Button to click on the screen:Add

    The minimum for each occurrence is 1 hour. You can add more time in 30-minute steps.

  • Check what you entered

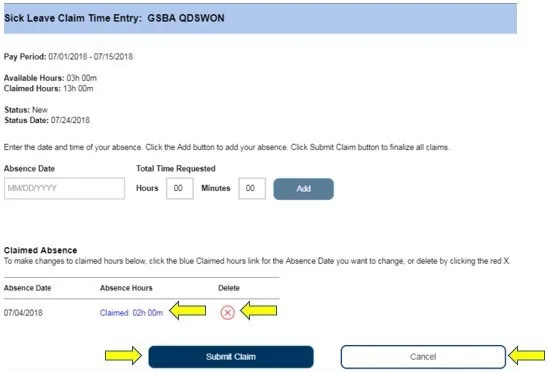
    Step 6: The Sick Leave Claim Time Entry screen with a claimed absence listed, the Claimed hours link, the red X and the Submit Claim button.
    CDSS screen, ESP Website Sick Leave Claim, 10/2026

    Each date you add appears under Claimed Absence. To change the hours, click the blue Claimed hours link. To delete a date, click the red X. To start over, click Cancel. When everything is right, click Submit Claim.

    Button to click on the screen:Submit Claim

    You cannot submit a claim for more than your available hours.

  • Sign your claim

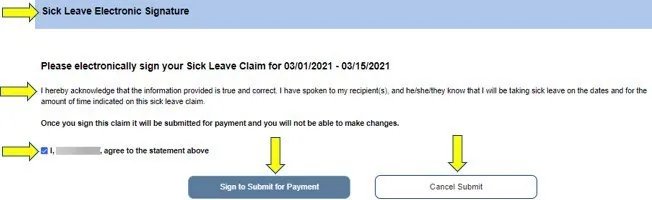
    Step 7: The Sick Leave Electronic Signature screen with the statement, the agreement box and the buttons to submit or cancel.
    CDSS screen, ESP Website Sick Leave Claim, 10/2026

    Read the statement that the information is true and correct. Check the box to agree. Click Submit for Payment.

    Button to click on the screen:Submit for Payment

    Not sure the hours are right? Click Cancel to go back and check the dates and hours.

  • Confirm

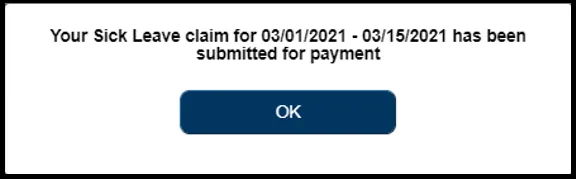
    Step 8: The confirmation message that the Sick Leave claim has been submitted for payment, with the OK button.
    CDSS screen, ESP Website Sick Leave Claim, 10/2026

    A message says your Sick Leave claim has been submitted for payment. Click OK. You go back to the Provider Home screen.

    Button to click on the screen:OK

Step 1

All steps in one list
  1. 1. Log in

    Enter your username and click Continue. Choose how to get your 6-digit one-time passcode, then enter it.

    The passcode expires after 10 minutes. If it did not arrive or it expired, click Resend Passcode.

    Source: CDSS ESP Website Sick Leave Claim, 10/2026, page 3

  2. 2. Open Sick Leave Claim

    On the Provider Home screen, click the Time Entry menu, then click Sick Leave Claim.

    Source: CDSS ESP Website Sick Leave Claim, 10/2026, page 4

  3. 3. Check your hours

    The Sick Leave Claim screen shows your Sick Leave Time, Available Hours and Claimed Hours for the current fiscal year.

    In July, if you still have available hours from the prior fiscal year, that year is shown too. You can still claim sick leave for a date in the prior fiscal year.

    Source: CDSS ESP Website Sick Leave Claim, 10/2026, page 5

  4. 4. Choose the pay period and the recipient

    Select the pay period and the recipient you worked for in that pay period, then click Next.

    Source: CDSS ESP Website Sick Leave Claim, 10/2026, page 6

  5. 5. Enter your sick time

    Type each sick date in the Absence Date box. Enter the hours and minutes you were absent but eligible to work. Click Add.

    The minimum for each occurrence is 1 hour. You can add more time in 30-minute steps.

    Source: CDSS ESP Website Sick Leave Claim, 10/2026, page 7

  6. 6. Check what you entered

    Each date you add appears under Claimed Absence. To change the hours, click the blue Claimed hours link. To delete a date, click the red X. To start over, click Cancel. When everything is right, click Submit Claim.

    You cannot submit a claim for more than your available hours.

    Source: CDSS ESP Website Sick Leave Claim, 10/2026, page 8

  7. 7. Sign your claim

    Read the statement that the information is true and correct. Check the box to agree. Click Submit for Payment.

    Not sure the hours are right? Click Cancel to go back and check the dates and hours.

    Source: CDSS ESP Website Sick Leave Claim, 10/2026, page 9

  8. 8. Confirm

    A message says your Sick Leave claim has been submitted for payment. Click OK. You go back to the Provider Home screen.

    Source: CDSS ESP Website Sick Leave Claim, 10/2026, page 10

Submitted your timesheet? Here is what happens next

  1. 3

    Recipient approves The recipient reviews the hours and approves or rejects the timesheet

  2. 4

    The state processes and pays A complete timesheet turned in on time is usually paid within 10 days of when the state receives it (SOC 846)

  3. 5

    What comes next? Where is my pay, direct deposit, taxes, paid sick leave

Get the official guide

Before you begin

  • You can only request paid sick leave if you have earned it. Your sick leave balance is on your paycheck or on the Sick Leave Claim Entry screen.
  • You can become eligible for paid sick leave after working 100 hours of authorized services for an IHSS recipient after their initial hire date.
  • You can use paid sick leave for yourself, or to care for a family member who is sick or has a medical appointment.
  • For a planned medical appointment, tell your recipient at least 48 hours before you use the sick leave.
  • For an unplanned medical need, tell your recipient right away, or within 2 hours before your start time.
  • You decide how many hours of paid sick leave you need for each occurrence. The minimum is 1 hour, and you can add more time in 30-minute steps.

Why use the ESP?

When you send your sick leave claim in the ESP, you can avoid getting the paper form SOC 2302 from the county or the CDSS website. You can also avoid possible delays in mailing and processing that form.

Source: ESP Website Sick Leave Claim, Revised 10/2026.

CDSS: ESP Website Sick Leave Claim, 10/2026